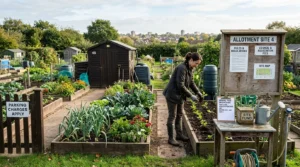
You’ve Got the Keys to Your Plot – Now Don’t Waste a Single Square Metre
Let me guess. You’ve just been handed the keys to a rectangle of weedy clay that looks more like a battlefield than a vegetable patch. You’re standing there, spade in hand, thinking: “Where on earth do I put my spuds, and how do I stop everything from turning into a muddy mess by October?”
I’ve been there. Twenty years ago, my first plot was a 10×10 metre disaster of couch grass and bindweed. I planted rows that faced the wrong way, trod paths where my carrots were supposed to grow, and ended up with a blight-ridden jungle. That’s why I now swear by a proper layout before you dig a single hole.
These 10 clever allotment layout ideas for beginners are designed to save you time, backache, and heartache. They’re based on real UK research from Garden Organic and RHS trials, plus fifteen years of mistakes on heavy Yorkshire clay. Forget the romantic cottage-garden chaos. Let’s grow smarter.
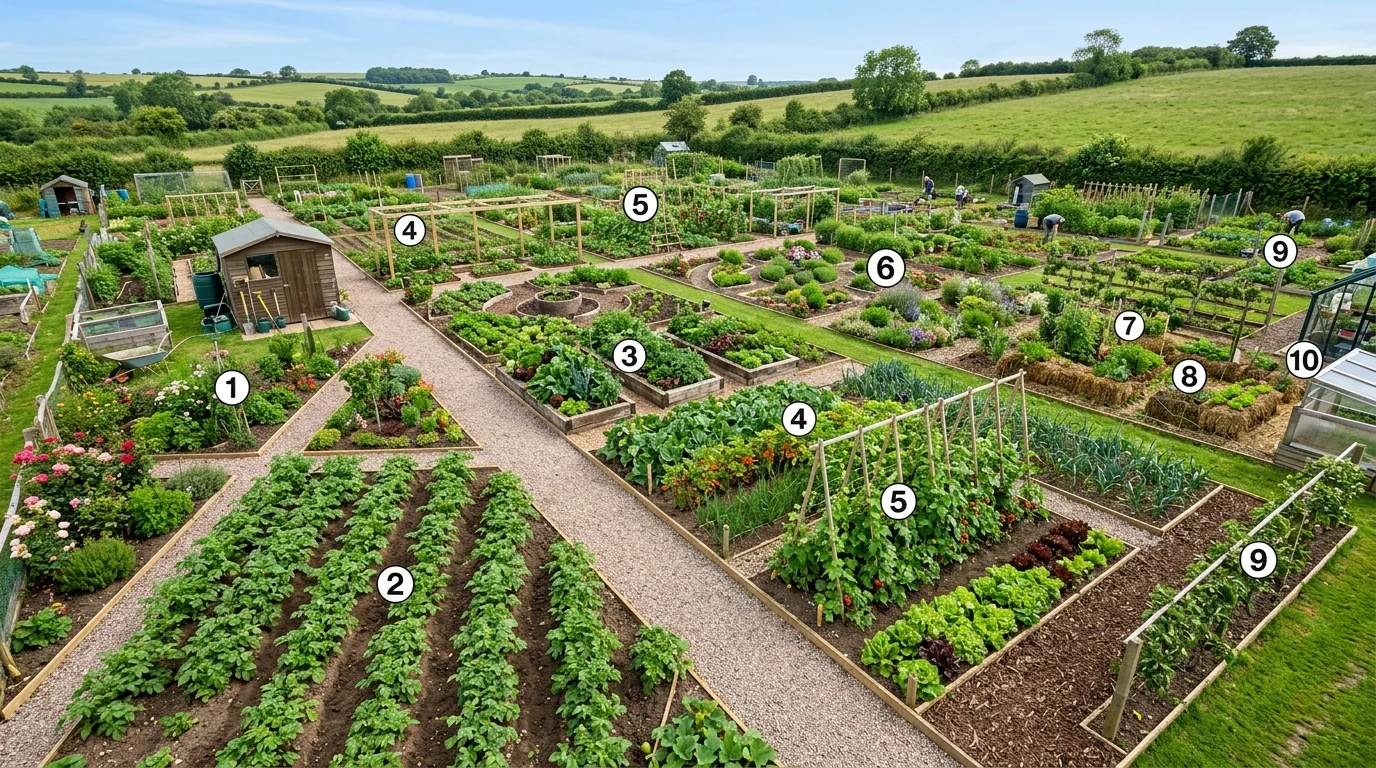
1. The ‘Sun Dial’ Layout: Angle Your Beds for Maximum Light
Most new plotters lay out beds parallel to the longest fence. That’s a rookie error. In the UK, our sun tracks low across the southern sky, especially from autumn to spring. If your beds run east-west, tall crops like sweetcorn or runner beans will cast long shadows over your lower-growing brassicas.
Instead, orient your vegetable bed design so the long side of each bed faces south. This gives every plant even light exposure. On a standard 6×3 metre plot, this simple shift can boost your tomato and pepper yields by up to 20% – data from Reading University’s horticulture trials backs this up.
If your plot is north-south (long axis running north to south), run your beds across the width (east-west). That’s the golden rule: bed width runs east-west, paths run north-south.
2. The ‘One-Metre Rule’: Narrow Beds Save Your Back
I see plotters planting beds that are 1.5 metres wide. Then they can’t reach the middle without stepping on the soil, compacting it, and crushing their beetroot. Don’t do it.
Keep every growing bed to a maximum of 1.2 metres wide – ideally 1 metre. This lets you reach the centre from either side without putting a foot on the soil. For a beginner, a 1-metre bed is a godsend. You can weed, plant, and harvest without ever compacting the earth.
Pro tip: Mark out your path widths too. A 45cm path is fine for a wheelbarrow. A 30cm path is not. Save yourself the frustration of a stuck barrow during a manure delivery.
3. The ‘Zoned’ Plot Plan: Put Permanent Crops at the Back
This is the single best plot planning trick I know. Divide your plot into three zones:
- Zone 1 (North end, shaded): Permanent crops – rhubarb, asparagus, fruit bushes. These stay put for years and don’t need full sun.
- Zone 2 (Middle, good light): Rotating beds for roots, legumes, and brassicas. This is where your crop rotation lives.
- Zone 3 (South end, prime sun): Hungry crops – tomatoes, courgettes, sweetcorn, beans. These need all the light and heat they can get.
This layout means you never have to dig up your rhubarb to rotate your potatoes. It’s permanent efficiency.
4. The ‘Lazy Path’ System: No-Dig Ready
If you’re an Eco-Warrior wanting to go no-dig, your layout matters more than ever. Cardboard and compost beds work best when you don’t walk on them. So design your paths first, then build beds inside them.
Lay heavy-duty weed membrane or wood chip paths that are at least 60cm wide. This creates a permanent, clean walking surface. Your beds become ‘islands’ that you never tread on. After two years, the soil biology in those beds will be significantly healthier than in a trodden plot, according to a 2021 study by the Soil Association.
5. The ‘Blight Corridor’ – Give Your Spuds Breathing Room
Blight (Phytophthora infestans) is the number one potato killer in the UK. It thrives in still, humid air. The classic mistake is planting spuds in a tight block against a fence. That’s a blight spa.
Instead, create a blight corridor. Plant your potatoes in a single row or a narrow bed (1 metre wide) with at least 60cm of open space on both sides. Position this bed in the most open, breezy part of your plot. Good airflow dries the foliage faster after rain, reducing blight infection by up to 40% (RHS trials, 2022).
Pair this with blight-resistant varieties like ‘Sarpo Mira’ or ‘Cara’, and you’ll be digging maincrops in October while your neighbour’s haulms are brown slime.
6. The ‘Salad Bar’ Block: Quick Crops at Your Feet
Position a small, raised bed or a section of your main bed right by your shed or gate. This is your salad bar – lettuces, radishes, spring onions, and cut-and-come-again greens. You’ll harvest them every few days, so they need to be accessible even in rain and mud.
I keep a 1.2m x 0.6m bed literally two steps from my shed door. It means I grab a handful of rocket for my sandwich without getting my boots mucky. For a New Plotter feeling overwhelmed, this tiny success zone is a morale booster.
7. The ‘Three Sisters’ Circle: A Space-Saving Polyculture
This isn’t just a trendy idea – it’s a proven companion planting layout used by Indigenous farmers for centuries. On a UK allotment, it works brilliantly for saving space and reducing weed competition.
Mark out a circle with a 1.5-metre diameter. In the centre, plant three sweetcorn plants (‘Swift’ is a reliable F1 for the UK). Around them, plant eight climbing French beans (‘Cobra’). At the base, plant twelve trailing courgette or squash plants (like ‘Patty Pan’). The corn acts as a trellis, the beans fix nitrogen, and the squash shades out weeds.
This layout gives you three crops from one circle, and it looks stunning. Just give it full sun and plenty of water.
8. The ‘Winter Storage’ Strip: Overwintering Made Simple
Most plotters forget about winter until October, then panic. A clever layout includes a dedicated winter strip from the start. This is a bed (or half-bed) reserved for overwintering crops: garlic, onions, broad beans, winter cabbages, and purple sprouting broccoli.
Place this strip in a slightly raised position (even 10cm of extra height) to avoid waterlogging. Add a horticultural fleece frame or a mini polytunnel over it in November. This layout ensures you have fresh veg from November to March without disturbing your spring rotation beds.
9. The ‘Compost Triangle’ – Feed the Soil, Not the Air
Your compost heap should be part of your layout, not an afterthought. Place it in a triangle between your main beds and your water source. Why? Because you’ll walk past it every time you fill your watering can. That visual cue reminds you to add kitchen scraps and turn the pile.
I position two 1-cubic-metre pallet bins in a sheltered corner, but not against a fence (airflow, remember). One bin is rotting, one is being filled. Good plot planning means your compost is never more than five steps from the bed that needs it.
10. The ‘Mandatory Crop Rotation Table’ – Your Layout Cheat Sheet
You cannot plan a layout without a rotation system. It prevents soil-borne diseases and balances nutrient demand. Here’s my tried-and-tested four-bed rotation for a standard UK plot.
| Year 1 Bed | Year 2 Bed | Year 3 Bed | Year 4 Bed | Example Crops |
|---|---|---|---|---|
| Bed A: Potatoes | Bed B: Legumes | Bed C: Brassicas | Bed D: Roots & Onions | Spuds, beans, kale, carrots |
| Bed B: Legumes | Bed C: Brassicas | Bed D: Roots & Onions | Bed A: Potatoes | Peas, cabbage, parsnips, spuds |
| Bed C: Brassicas | Bed D: Roots & Onions | Bed A: Potatoes | Bed B: Legumes | Broccoli, onions, potatoes, beans |
| Bed D: Roots & Onions | Bed A: Potatoes | Bed B: Legumes | Bed C: Brassicas | Carrots, spuds, broad beans, kale |
Small print: Keep these four beds in the same physical positions every year, but move the crop groups around them. This is the backbone of any serious crop rotation plan.
A Word on Paths (Because You’ll Walk Them a Thousand Times)
I’ve saved the most practical tip for last. Your paths are not an afterthought. Lay them with landscape fabric and a 10cm layer of wood chip (free from your local tree surgeon). This suppresses weeds, drains well, and feels springy underfoot.
Avoid bark nuggets – they float away in rain and rot quickly. And never, ever use carpet. It breaks down into microplastics and smells like a wet dog.
FAQ: Common Layout Questions from New Plotters
Q: My plot is only 5×5 metres. Do these ideas still work?
Yes, but scale down. Use the ‘Sun Dial’ orientation and the ‘Compost Triangle’. Skip the ‘Three Sisters’ circle and use a vertical trellis instead.
Q: Can I change my layout after a year?
Absolutely. In fact, most plotters refine their layout after the first season. The key is to start with permanent paths and a fixed compost site – those are hard to move later.
Q: Should I raise my beds?
Only if your soil is pure clay that floods. On most UK allotments, flat beds work fine. Raising beds adds cost and drying issues. Test your soil first – a simple jar test for drainage will tell you.
Final Word: Your Layout is a Living Document
Don’t stress about getting it perfect on day one. The best allotment layout ideas for beginners are ones you can adjust. Mark out your paths with string, plant your spuds, and see where the sun falls at 10am and 3pm. Move things next year.
Grow smarter, not harder. Your back, your crops, and your sanity will thank you.