Stop Pouring Money Down the Drain – Your Compost Heap is the Cheapest Fertiliser You’ll Ever Make
You’ve cleared your plot, battled the bindweed, and finally got your spuds in the ground. Then you hit the garden centre and see the price of a single bag of well-rotted manure. £8.50 for something that is, essentially, decomposed plant matter. It stings, doesn’t it?
Here’s the truth: the single most cost-effective, soil-transforming amendment you’ll ever use is already sitting in your wheelbarrow. It’s the weeds you pulled, the old brassica stalks, and the tea bags from your flask. The secret is knowing how to start a compost heap on an allotment that actually works – one that doesn’t turn into a slimy, smelly, rat-attracting mess.
I’ve been running the Heckley Lane Community Allotments for fifteen years, and I’ve seen it all. The ‘dry hay bale’ pile that never rots. The ‘green slime pit’ that stinks to high heaven. And the glorious, crumbly, dark gold that feels like silk and smells like a forest floor. That last one is what we’re aiming for. Let’s cut the romanticism and get down to the science of bacterial decomposition.
The Great Green vs. Brown Balancing Act
This is the single most common mistake I see. New plotters pile on a mountain of grass clippings (pure green) and wonder why it turns into a stinking, anaerobic sludge. Others add only dry cardboard and twigs (pure brown) and wait a year for a pile of dry sticks.
Your compost heap is a living system. It’s a microbial feeding frenzy. Those bacteria and fungi need two things: nitrogen (from green waste) for growth and reproduction, and carbon (from brown waste) for energy. Get the ratio wrong, and the system crashes.
The golden rule is a ratio of roughly 2:1 brown to green by volume. Forget the academic charts; here is the practical breakdown:
| Green Waste (Nitrogen – ‘The Fuel’) | Brown Waste (Carbon – ‘The Energy’) |
| :— | :— |
| Grass clippings (thin layers only) | Straw or spoiled hay |
| Vegetable peelings & fruit scraps | Dried leaves (oak, beech – avoid sycamore in bulk) |
| Soft annual weeds (before they seed) | Shredded cardboard & newspaper (no glossy inserts) |
| Tea bags & coffee grounds | Wood shavings or sawdust (from untreated wood only) |
| Manure (horse, chicken, rabbit – well-rotted is best) | Small twigs & prunings (chop to 10cm lengths) |
| Comfrey leaves (an excellent activator) | Old cardboard egg boxes & toilet roll tubes |
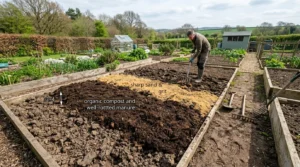
Your job is to build a lasagne, not a single-layer pizza. Start with a 15-20cm layer of coarse brown material (twigs, straw) at the bottom for drainage. Then add a 10cm layer of green, followed by a 20cm layer of brown. Repeat. If the pile smells like ammonia, you have too much green. If nothing is happening after a month, you have too much brown.
Choosing Your Compost Container (Or Going Without)
There is no ‘best’ system. It depends on your budget, your plot size, and the local rat population. I’ve used everything from pallet bins to expensive tumblers.
The Pallet Bin (The Allotment Gold Standard)
This is my go-to for a reason. Find four wooden pallets (avoid chemically treated ones – look for the HT stamp). Lash them together with wire or rope, leaving one side removable for access. This is cheap (often free), allows excellent airflow, and you can make it as big as you like. Aim for a minimum of 1 cubic metre (1m x 1m x 1m). Smaller piles struggle to hold the heat needed for fast decomposition.
The Plastic Dalek (Good for small plots or no-dig fans)
These ‘tumble’ composters are neat and keep the contents contained. However, they often suffer from poor aeration and can become waterlogged. The ‘twist’ models are a nightmare to empty. If you buy one, look for one with a large access hatch and a solid base you can remove. You will need to manually aerate it with a compost aerator tool.
The Open Heap (Only for the brave or the rural)
Just piling it on the ground works for some, but on a community allotment, this is a rats’ Christmas dinner. It dries out quickly, loses nutrients to rain, and looks unsightly. If you have a massive plot and a neighbour with a terrier, go ahead. For most of us, a contained system is better.
The Turning Debate: Do You Really Need To?
The textbooks say turn your pile every 2-4 weeks. The no-dig purists say never turn it. Who is right? It depends on how fast you want your compost.
Turning (Hot Composting): If you turn a well-balanced pile, the internal temperature hits 55-65°C. This kills most weed seeds and pathogens. You get usable compost in 8-12 weeks. This is the ‘grow smarter’ approach for yield-focused growers. The downside? Hard work. A 1m³ pile of wet compost weighs a ton.
No-Turn (Cold Composting): This is the ‘grow slower’ approach. You add layers, let the worms and fungi do the work, and wait 9-12 months. The result is a more fungal-dominant compost, which is excellent for no-dig beds and clay soil structure. You lose some nutrients to the air, and weed seeds survive, but you save your back.
My recommendation? Start with the no-turn method for your first pile. It builds confidence. Add your greens and browns in the right ratios, keep it damp (like a wrung-out sponge), and let it sit for a year. If you want a fast, hot pile for next spring, build a second bin and turn that one.
How to turn a pile properly (when you do it):
1. Fork the entire contents of Bin 1 into Bin 2.
2. As you move it, make sure the material from the outside of the old pile goes into the middle of the new pile.
3. Water any dry pockets as you go.
4. Cover the new pile with an old carpet, a tarp, or thick cardboard. This traps heat and keeps rain out (rain leaches nutrients).
The Two Biggest Problems (And Their Science-Backed Fixes)
Problem 1: It’s a slimy, green, stinking mess.
Cause: Too much nitrogen (green) and not enough air. The pile has gone anaerobic.
The fix: Immediate. Fork the entire pile out. Add a huge amount of dry brown material – shredded cardboard, dry leaves, straw. Mix it thoroughly. If you have a handful of lime or wood ash, add that. Then rebuild the pile, ensuring the brown layers are thick. This is a salvage job, not a failure.
Problem 2: It’s bone dry and nothing is happening.
Cause: Too much brown material and insufficient moisture. Bacteria need water to move and eat.
The fix: Get a hose with a fine spray. Soak the pile until water just begins to drip from the base. Then mix in a layer of fresh green comfrey leaves, grass clippings, or a nitrogen-rich activator like chicken manure pellets. The water reawakens the microbes; the green feeds them.
What NOT to Put in Your Allotment Compost
This list is non-negotiable. These items attract vermin, spread disease, or simply don’t break down in a cold pile.
– Cooked food, meat, fish, dairy: Rat magnet. End of.
– Perennial weeds: Couch grass roots, bindweed, docks, ground elder. They root in the pile and survive. Burn them or drown them in a bucket of water for a month first.
– Diseased plant material: Blighted potato haulms, brassica clubroot roots, onion white rot. The standard cold pile doesn’t get hot enough to kill these pathogens. Destroy or bin them.
– Seed heads: Fat hen, chickweed, groundsel. You are just planting a next generation of weeds.
– Glossy paper, plastic-coated cardboard, cat/dog waste: Chemicals or pathogens you don’t want on your veg beds.
How to Use Your Black Gold
When your compost is dark, crumbly, and smells like a damp woodland, it’s ready. For heavy clay, this stuff is liquid gold.
– As a mulch: Apply a 5-7cm layer on top of your no-dig beds in autumn or spring. The worms pull it down.
– As a soil improver: Fork it into the top 10-15cm of your beds before planting heavy feeders like brassicas or pumpkins.
– As a potting mix: Sieve it through a 10mm mesh and mix 1:1 with sharp sand and garden soil for a free potting compost. Do not use pure compost in pots – it’s too rich.
I have a simple rule on my plot: every square metre of growing bed gets a full wheelbarrow of homemade compost every year. It saves me £50 a year on bought-in soil conditioners, and the soil structure on our heavy clay is unrecognisable from ten years ago. The worms are the size of my little finger.
Stop overthinking it. You just need a bay, a balance of greens and browns, and a little patience. Start today. Your soil – and your wallet – will thank you.
Frequently Asked Questions About Starting a Compost Heap on an Allotment
Q: I only have a small allotment. Is it worth making compost?
A: Absolutely. Even a 50-litre plastic bin can significantly reduce your green waste and produce enough ‘black gold’ for a few square metres of beds. Scale your container to your waste output, not your plot size.
Q: My heap is full of ants. Is that bad?
A: Ants usually indicate your heap is too dry. They won’t harm the compost, but they are a sign that microbial activity has slowed. Give the pile a good soaking and turn it to redistribute moisture.
Q: Can I put weeds like nettles in my compost?
A: Nettles are an excellent green activator. However, only add them before they set seed. If they have seed heads, bag them and take them to the council green waste site. Pull them up by the roots; they don’t spread as badly as couch grass.
Q: How do I stop the compost heap smelling on my allotment?
A: Smell is always an anaerobic (no air) problem. The fix is to add more brown material (cardboard, straw) and turn the pile to introduce oxygen. A properly balanced 2:1 brown-to-green heap should have an earthy, not foul, smell.
Q: Is it safe to use compost from my heap on vegetable beds?
A: Yes, if you follow the guidelines above. Avoid adding meat, dairy, or diseased plants. If you are worried about pathogens, use your compost on established beds for a few years, not directly on seedbeds for carrots or salads. A hot compost (turned pile) is safer than a cold pile.