You have survived the season. Your tools have not.
Let’s be honest. You’ve spent the last eight months digging, hoeing, and pruning, and your secateurs are now better used as a nutcracker than a cutting tool. Your spade looks like it was dredged from the Titanic. And that rust? It is not patina. It is neglect. But winter is the great reset. A few hours with some sharpening stones, a bucket of warm water, and a tin of linseed oil, and you can make your old spades and secateurs cut like brand new.
I have been running a 20-plot community allotment for 15 years. I have seen tools left out in the rain, buried under manure piles, and used to pry open paint tins. I have also seen the joy on a plotter’s face when they slice through a thick bramble stem with a freshly honed blade. That joy is cheap, and it lasts. Here is the no-nonsense, science-backed protocol for cleaning and sharpening your entire toolkit.
Why winter is the perfect time for tool maintenance
Cold, damp soil accelerates rust formation. When you put away a muddy spade in November, that moisture sits on the steel and starts a chemical reaction that pits the metal. A 2019 study by Garden Organic noted that soil-borne pathogens like *Streptomyces scabies* (common scab on potatoes) can also transfer from dirty blades to healthy plants in spring. Cleaning is not just about aesthetics; it is about biosecurity.
Winter also gives you the time to do the job properly. You are not rushing to get the parsnips harvested before the frost. You can sit in a warm shed, listen to the radio, and give your tools the respect they deserve.
Tools you need (the non-negotiable list)
Before we start, gather these items. Do not substitute. Your granddad’s angle grinder is not the same as a sharpening stone for delicate secateurs.
- Stiff wire brush – For knocking off dried mud and heavy rust.
- Bucket of warm, soapy water – Use a mild detergent. No bleach.
- Fine-grit sharpening stone – I recommend a combination stone (coarse 250-grit on one side, fine 1000-grit on the other). Brands like DMT or Arkansas stones work well. Avoid cheap diamond plates that wear out after two uses.
- Linseed oil – Boiled linseed oil (available at any UK hardware store like Wilko or B&Q) is your best friend for wooden handles. It penetrates the wood and prevents splitting.
- Camellia oil or 3-in-1 tool oil – For metal pivot points and blades. Avoid vegetable oil; it goes rancid and gums up the mechanism.
- Old rag – Several of them.
- Leather gloves – Sharp blades are dangerous. Respect them.
Step 1: The deep clean (get rid of the gunk)
Start with your rusty spades. Take the wire brush and scrub the entire blade surface hard. You are not trying to polish it; you are removing loose rust and soil. If you have caked-on clay, soak the spade in a bucket of warm water for ten minutes first. Then scrub again.
For secateurs and shears, disassemble them if possible. Most Felco and Spear & Jackson models have a central screw that allows you to separate the two blades. This makes cleaning the pivot area much easier. Wash each part in soapy water and dry immediately with a rag. Do not leave them wet.
For stainless steel tools (common on trowels and hand forks), you will find less rust, but they still need cleaning. Use a nylon scouring pad dipped in soapy water.
Step 2: Removing rust (the tough stuff)
Surface rust on a spade is cosmetic. Deep pitting is a problem. If your spade has deep pits, you may need a coarser approach. Use a medium-grit sandpaper (120-grit) wrapped around a block of wood. Sand in the direction of the blade edge, not sideways. This preserves the metal grain.
For secateurs with rust on the cutting edge, use a fine steel wool (grade 0000) and a drop of tool oil. Rub gently. Do not use abrasive sandpaper on the cutting edge of secateurs; it will ruin the geometry.
A quick tip: use a rust remover like WD-40 Specialist Rust Remover if you have heavily corroded heirloom tools. Soak a cloth in it, wrap the blade, and leave for 15 minutes. Then scrub with the wire brush.
Step 3: Sharpening – the art of the edge
This is where most people make mistakes. They drag a sharpening stone back and forth like they are sawing wood. That creates a burr and a dull edge. Instead, follow this system.
Sharpening a spade or shovel
Clamp the spade in a vice or hold it securely between your knees. You want the blade edge facing upwards. Take your sharpening stone (use the coarse side first if the edge is badly nicked). Hold the stone at a consistent angle—roughly 20 to 25 degrees from the flat of the blade. Push the stone away from you along the edge, from the base of the blade to the tip. Use a smooth, sweeping motion. Do not pull back and forth. Repeat 10 to 15 times. Then flip the stone to the fine side and do the same pass.
You should see a bright, even line on the edge. That is your new cutting surface.
Sharpening secateurs and shears
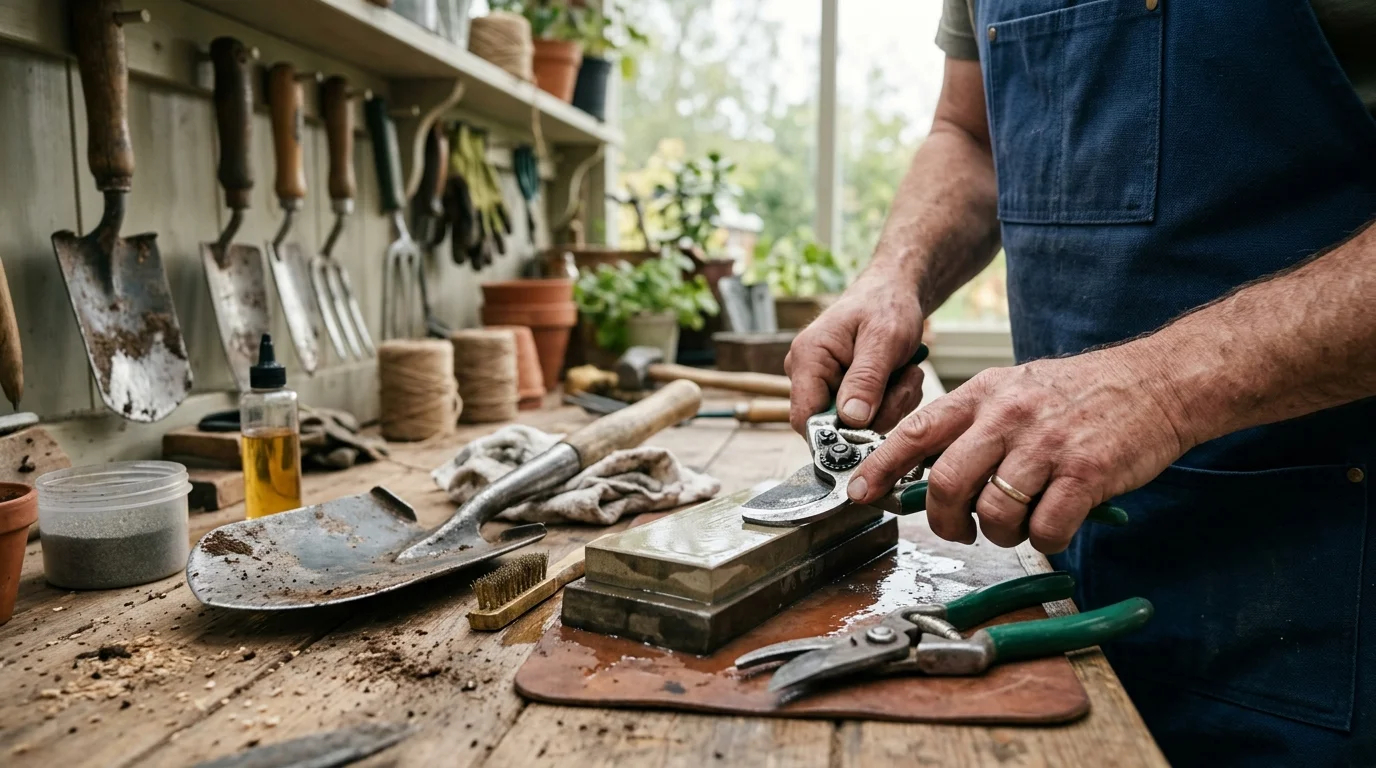
Secateurs have a curved blade that meets a flat anvil or a second blade. You only sharpen the bevel side (the outside curve). Never sharpen the flat side. Hold the sharpening stone at the same angle as the factory bevel (usually 20 degrees). Run the stone from the pivot point to the tip in one smooth motion. Repeat 8 to 10 times. Then remove the burr on the flat side by running the stone flat against it once—very gently.
Test the sharpness on a piece of newspaper. It should slice through cleanly, not tear.
Critical maintenance table: tool by tool
Here is a quick-reference table for the most common allotment tools.
| Tool | Material | Best sharpening method | Lubricant for pivot |
|---|---|---|---|
| Spade / Shovel | Carbon steel | Flat file (coarse) then sharpening stone | Not needed (no pivot) |
| Hoe (draw hoe) | Carbon steel | File the top edge only | Not needed |
| Secateurs (bypass) | High-carbon steel | Sharpening stone, bevel side only | 3-in-1 oil |
| Secateurs (anvil) | Steel | Sharpening stone, bevel side | 3-in-1 oil |
| Stainless steel trowel | Stainless | Rarely needed; use fine stone if dull | Not needed |
| Pruning saw | Carbon steel | Special saw file (triangular) | WD-40 |
Step 4: Oiling wooden handles – the secret to longevity
A dry wooden handle is a broken handle waiting to happen. Cracks form, splinters appear, and eventually the head flies off when you are digging heavy clay. Linseed oil is the cure.
Pour a small amount of boiled linseed oil onto a rag (not directly onto the wood). Rub it into the handle thoroughly, working it into the grain. Let it soak for 15 minutes, then wipe off the excess. Leave the tool to dry horizontally for 24 hours. Repeat once a year.
Do not use raw linseed oil; it takes weeks to dry and can become sticky. Boiled linseed oil dries in a few hours and hardens to a protective layer.
Step 5: Storage – don’t undo your work
You have cleaned, sharpened, and oiled. Now store them properly. Never leave tools on the ground in a damp shed. Hang them on a wall rack or stand them in a bucket of sand mixed with a little used engine oil (this keeps the blades rust-free). If you use a wooden tool rack, make sure it is in a dry, ventilated space.
For secateurs, keep them closed and hang them by the strap. Some plotters spray a light coat of Camellia oil on the blades before storing for winter. This forms a thin barrier against moisture.
Common mistakes to avoid
I have seen every error in the book. Here is what you should never do.
- Using a power grinder on secateurs. It overheats the steel and ruins the temper. Hand sharpening only.
- Leaving tools in a bucket of water to soak overnight. You are just creating a rust bath.
- Applying linseed oil to wet wood. The oil will seal in moisture and cause rot.
- Sharpening a hoe on the wrong side. Hoes are sharpened on the top (bevel) edge only. Sharpening the bottom edge makes it dig too deep.
When to replace vs. repair
Not every tool is worth saving. If the blade of a spade is worn down to less than half its original width, replace it. If the wooden handle has a long crack that goes through to the metal socket, replace the handle (or the whole tool). Cheap secateurs that cannot be disassembled are often not worth the time. Invest in a quality brand like Felco, which offers replacement parts for decades.
For a deeper dive into tool restoration, I recommend the RHS guide on tool care available at rhs.org.uk, and the practical videos from Gardeners’ World on YouTube. They show techniques that are easy to follow.
Frequently Asked Questions (the ones I get every winter)
Can I use vinegar to remove rust from garden tools?
Yes, white vinegar (acetic acid) works well for light rust. Soak the tool for 12-24 hours, then scrub with a wire brush. Rinse thoroughly and dry immediately. Do not use on stainless steel; it can cause pitting.
How often should I sharpen my secateurs?
For average use (pruning soft stems and deadheading), once a year is enough. If you are cutting thick woody stems frequently, sharpen every three months. The moment you feel resistance, it is time.
Is linseed oil food-safe for tools used on vegetables?
Boiled linseed oil is generally considered safe once fully cured (dry to the touch). However, if you are concerned, use raw linseed oil (which takes longer to dry) or a food-grade mineral oil. I have used boiled linseed oil on my tool handles for 15 years with no issue.
My spade has a wooden handle that is loose. How do I fix it?
Soak the handle end in water for a few hours to swell the wood. If that does not work, remove the old wedge, tap in a new wooden or metal wedge (available at B&Q), and reseat the handle. Apply a little waterproof wood glue.
The payoff
Spending two hours this winter on cleaning and sharpening your tools will save you ten hours of frustration next season. A sharp spade cuts through clay like butter. A clean pair of secateurs gives you a precise cut that heals faster, reducing disease entry points. And a linseed-oiled handle feels like a firm handshake from an old friend.
You are not just maintaining tools. You are respecting the work they do for you. And when spring comes, you will be ready.
Now go pick up that rusty spade. It is time to give it a second life.