Stop Watching Your Water Bill Rise – Start Collecting Rain from Your Shed Roof
You’ve spent all winter digging in clay, planting bare-root fruit bushes, and nurturing onion sets. Then May arrives with a hosepipe ban. Or, more likely, you’re hauling a 10-litre watering can from a standpipe 50 metres away, three times a week. It’s exhausting, wasteful, and frankly, bonkers. The average 1.8m x 1.2m allotment shed roof catches over 2,000 litres of rain per year in the UK. That’s enough to water a 250 sq ft plot of thirsty tomatoes, beans, and squash for an entire dry season. Let’s talk about how to collect rainwater from an allotment shed without spending a fortune or needing a plumbing degree.
Why Your Shed Roof is a Goldmine
Before we dive into guttering kits and diverter kits, understand the maths. A single millimetre of rainfall on a one-square-metre surface gives you exactly one litre of water. The UK averages 800-1,200mm of rain annually depending on your region (the Met Office has county-level data). A standard 6x4ft (1.8×1.2m) shed roof – that’s 2.16 sq metres – catches roughly 2,160 litres per year. Even a small 4x3ft lean-to collects 1,080 litres. That’s free, soft, chlorine-free water that your crops will love far more than tap water. Rainwater has a neutral pH and contains trace nitrogen from atmospheric fixation. Your carrots and courgettes don’t care about the water bill – they care about consistent hydration.
Choosing the Right Guttering Kit for an Allotment Shed
Most allotment sheds have a corrugated metal or felt-covered roof. Standard domestic guttering systems (like those from Floplast or Freefoam) work fine, but you’ll need adaptors for corrugated sheets. Here’s the no-nonsense checklist:
- Measure the drop edge. This is the lower edge of the roof where water runs off. For corrugated roofs, you need a corrugated roof gutter bracket (sold at B&Q, Screwfix, or online at Garden Organic). These clip into the troughs of the corrugations.
- Use 68mm or 82mm gutter profile. For a small shed (under 2m long), 68mm is adequate. For larger roofs, go with 82mm to handle Yorkshire downpours.
- Add a leaf guard. Allotment sheds sit under trees. A simple mesh gutter brush or plastic leaf filter saves you unclogging downpipes every week in autumn.
- Include a downpipe mesh. Fit a gutter mesh guard at the top of the downpipe to stop twigs and moss entering your water butt.
Pro tip: If your shed roof is felt, you can screw brackets directly into the fascia board (the wooden edge). If it’s corrugated metal, use the brackets designed to hook under the corrugation – never drill into the roof itself unless you want leaks.
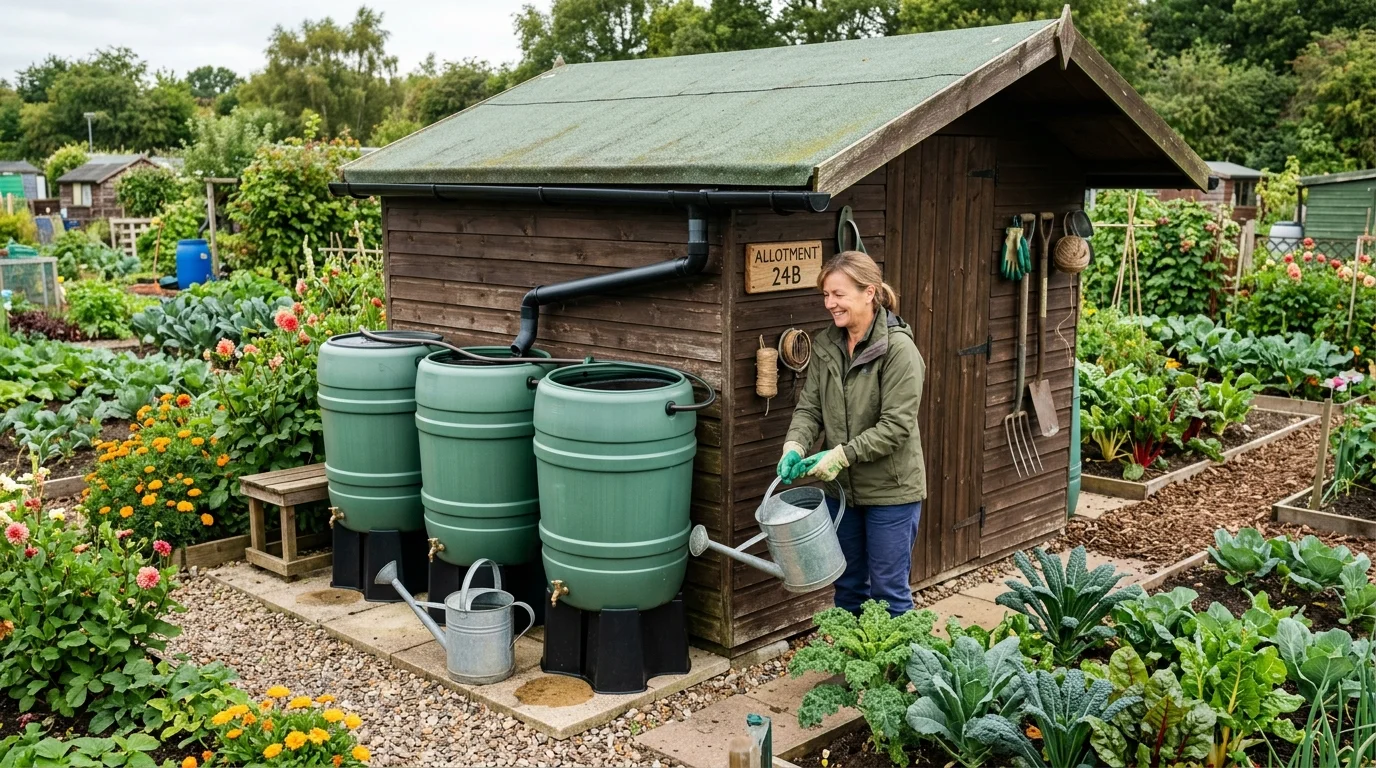
Water Butts: Stack Them or Link Them
A single 200-litre water butt is the minimum. But if you’ve done the maths above, you’ll quickly overflow it. The trick is to link multiple water butts together using a linking kit (a simple hose connector with washers). I recommend starting with two 200-litre butts placed side-by-side on a sturdy, level base. Position them on concrete slabs or a pallet to keep the base off the ground – this prevents freezing in winter and makes it easier to fill a watering can.
| Butt Type | Capacity | Cost (approx) | Best For |
|---|---|---|---|
| Standard slimline (plastic) | 100-150L | £20-30 | Small sheds, tight spaces |
| Standard round (plastic) | 200L | £30-45 | Most 6x4ft sheds |
| Heavy-duty recycled (brown/black) | 300-400L | £50-80 | Large sheds, high rainfall areas |
| IBC tank (1000L) | 1000L | £50-100 (used) | Serious off-grid water storage (needs planning) |
Linking multiple butts is simple: Drill a hole near the top of the first butt and a matching hole near the top of the second. Insert a brass or plastic connecting hose (the kit includes rubber washers). Water fills the first butt, then overflows into the second. You can chain up to four butts this way. Position them so the last butt in the chain has an overflow hose directed into a rain garden or drain – never let water pool near your shed foundations.
Off-Grid Water: Getting It from the Roof to the Butt
Here’s where most plotters mess up. You need a downpipe diverter if you’re using a standard gutter system, or a direct gutter outlet if you’re customising. For a shed, the simplest solution is a corrugated roof outlet (around £5-10 from a builders’ merchant). This is a plastic fitting that sits in a corrugation trough and has a hose tail. You connect a short length of 50mm or 68mm downpipe to it, then direct that into your water butt lid.
Critical step: Create an overflow. Drill a hole near the top of your water butt (just below the lid rim) and fit a brass overflow kit (about £8). Connect a hose to this that directs excess water away from your shed base and into a nearby bed or drain. If you don’t, heavy rain will fill the butt, then flood around the lid, saturating your shed floor and rotting the base.
Positioning Your Water Butts for Maximum Efficiency
Site your butts on the side of the shed that receives the most rainfall – typically the side facing prevailing south-westerly winds. In Yorkshire, that’s the west or south-west side. Also, place them close to the area you water most. If your plot has a vegetable patch on the south side, put the butts there. Every metre you carry a full watering can is wasted energy.
Raise the butts on a concrete block plinth or pallet to at least 30cm off the ground. This lets you fit a standard watering can under the tap. A 200-litre butt weighs 200kg when full, so the base must be level and firm. If you’re on clay soil, add a layer of hardcore underneath to prevent sinking.
Winterisation – Don’t Let Frost Ruin Your System
Come November, your water butt system needs a winter check. Empty all butts completely – frozen water expands and cracks plastic. Drain the downpipe by disconnecting the diverter. Store the connecting hoses indoors. If you want year-round collection, you can keep one butt in use with a floating heater (a low-wattage aquarium heater works, but check your site rules – many allotments ban electrical items). Personally, I drain everything and rely on autumn rain stored in a buried IBC tank for winter watering of overwintering onions and garlic. That’s an advanced off-grid setup, but it works.
Cost-Benefit Analysis: Is It Worth It?
Let’s be honest: a full guttering kit, two 200-litre butts, connectors, and brackets will set you back around £80-120. That’s roughly the cost of a year’s water bill for a small plot if you’re on a meter. But the real value is time and convenience. You stop carrying heavy cans 50 metres. You never get caught short during a hosepipe ban. And your plants get rain water – which studies from the RHS show improves leaf growth and reduces stress compared to hard tap water. For the Thrifty Grower, the payback period is under two seasons. For the New Plotter, it’s the difference between a thriving plot and a wilting disaster.
Common Mistakes to Avoid
- Using a plastic dustbin as a water butt. They aren’t UV-stabilised; they crack in sunlight within a year. Buy a proper water butt designed for outdoor use.
- Forgetting the lid. An open butt breeds mosquitoes and collects leaf debris. Always keep the lid on – use a child-safe lid lock if the site has kids.
- Placing the butt on bare soil. It sinks, tilts, and the tap ends up under the base. Always use a solid platform.
- Using a flexible hose for the downpipe. It kinks and blocks. Use rigid 50mm or 68mm downpipe with push-fit connectors.
Off-Grid Water for the Eco-Warrior – Advanced Setup
If you want true off-grid independence, consider a first-flush diverter. This clever device uses a small chamber that captures the first few litres of rain (which wash bird droppings and dust off the roof) and automatically switches to clean water after that. It costs about £25-40 but adds years to your soil health by reducing contaminants. Pair it with a rainwater harvesting system that feeds into a buried IBC tank via a submersible pump (if your site allows). This gives you pressurised water for drip irrigation – a gamechanger for thirsty polytunnels.
For most of us, a simple gravity-fed system with two linked butts is plenty. I’ve used exactly this system on my own Yorkshire clay plot for eight years. It has never let me down, even during the 2022 drought when I was the only plotter with water in July.
Frequently Asked Questions about Rainwater Collection from an Allotment Shed
Do I need planning permission for a water butt on my allotment?No, not for standard domestic-sized water butts. Some allotment associations have rules about height or visibility – check with your site secretary. Buried IBC tanks may require permission.
Can I use a 1000-litre IBC tank with a shed roof?Yes, but you’ll need a large roof (at least 10 sq metres) to fill it. Use a pump to move water to a header tank. Ensure the IBC is food-grade and UV-protected.
How do I stop the water from going green in summer?Keep the butt opaque and add a algae prevention tablet (available at garden centres). Or simply use the water quickly – algae grows in stagnant water. Daily use keeps it clear.
Can I collect rain from a felt roof?Yes, felt roofs are fine. Avoid collecting from lead or copper roofs – heavy metals leach into the water. Felt and corrugated metal are safe for edible crops.
Grow Smarter, Not Harder – Start Collecting This Weekend
You don’t need a PhD in hydrology. You need a Saturday afternoon, a guttering kit from your local builders’ merchant, and two water butts. Measure your shed roof, buy the brackets that fit your corrugation type, link the butts, and test the flow with a watering can. The satisfaction of watering your broad beans with free rain in July is immense. And your back will thank you. For more UK-specific advice, check the RHS guide on water conservation in gardens or the Sustainable Water Network for allotment case studies. Now go get that gutter.