You’ve cleared the couch grass, you’ve dug in the manure, and you’ve dreamed of prize-winning courgettes. But here’s the secret the glossy magazines won’t tell you: if you don’t know your soil’s pH, you’re gardening blind.
I’ve seen it a hundred times on our Yorkshire site. A new plotter spends a fortune on ericaceous compost for blueberries, only to watch them turn chlorotic and sulk. Another throws lime on their entire plot because their grandad swore by it, then wonders why their potatoes get scab. It’s not magic. It’s soil science, and it’s dead simple.
Testing your soil pH and texture is the single cheapest, most effective thing you can do to unlock your plot’s potential. A simple home soil testing kit costs less than a bag of compost and can save you years of frustration. Let me walk you through exactly how to do it, no lab coat required.
Why pH matters more than you think
Think of pH as the gatekeeper of nutrients. It’s a scale from 1 (acidic) to 14 (alkaline), with 7 being neutral. Most vegetables thrive in a slightly acidic range of 6.0 to 7.0. But here’s the crunch: at pH 5.5, phosphorus becomes locked up. At pH 8.0, iron and manganese become unavailable. Your plants can be surrounded by nutrients but starve if the pH is off.
I’ve run trials on our allotment comparing identical potato varieties at pH 5.8 and pH 7.2. The difference in yield was over 30 percent. That’s not a subtle effect. If you’re trying to grow brassicas (cabbage, kale, broccoli) in acidic soil, they’ll be stunted and prone to club root. Conversely, if you try to grow blueberries or rhododendrons in alkaline soil, they’ll turn yellow and die. A simple how to test allotment soil pH routine tells you exactly where you stand.
What you need for a basic soil test
You don’t need expensive lab equipment. For a reliable DIY check, grab a soil testing kit from a garden centre or online. I recommend the RHS-approved test kits like those from Luster Leaf or Rapidtest (available at B&Q or Amazon for under £10). These use a colour-change indicator dye. Alternatively, you can buy a digital pH meter for about £15, but calibrate it monthly with buffer solution.
Here’s your shopping list:
– A clean trowel or hand fork
– A glass or plastic bowl (no metal – it can skew results)
– Distilled water (tap water has additives that affect pH)
– Your test kit or meter
– A notebook and pen
Step-by-step: How to test allotment soil pH
Follow these steps exactly. Skipping them gives you junk data.
- Sample from multiple spots. Your allotment is not uniform. Take soil from at least five locations across your plot – near the top, middle, bottom, and both sides. Mix all samples together in your bowl. This gives you a representative average. Avoid areas near compost heaps or paths.
- Remove debris. Pick out stones, roots, and any visible worm castings. Crush any large clods. You want fine, crumbly soil.
- Use the correct ratio. Most kits require 1 part soil to 1 part distilled water. A typical amount is a heaped teaspoon of soil mixed with a teaspoon of water. Stir well and let it sit for 1-2 minutes.
- Add the indicator dye. Follow your kit’s instructions. Usually, you add a few drops of a chemical reagent, then shake vigorously. Wait the exact time specified (usually 30-60 seconds).
- Compare the colour. Hold the test tube against the colour chart provided. Do it in natural daylight, not under a yellow kitchen bulb. Record the pH reading in your notebook.
- Repeat with a second sample. For accuracy, do the whole process twice. If readings differ by more than 0.3, take a third sample.
If you’re using a digital meter, push the probe into the dampened soil, wait 60 seconds, and read. Clean the probe with distilled water between samples.
Interpreting your pH results
Here’s a quick reference table for UK allotment soils:
| pH Range | Soil Type / Condition | What Grows Well | Action Needed |
|---|---|---|---|
| Below 5.0 | Very acid (rare in UK, but can occur under conifers or peat bogs) | Blueberries, rhododendrons, potatoes (tolerant) | Add garden lime (calcium carbonate) at 500g per sq m per year, retest annually |
| 5.0 – 6.0 | Acid – common on sandy soils and former heathland | Potatoes, carrots, parsnips, raspberries, strawberries | Lime if growing brassicas or peas/beans; otherwise fine for acid-loving crops |
| 6.0 – 7.0 | Ideal for most vegetables | Nearly everything: tomatoes, beans, onions, lettuce, brassicas, root crops | No action needed – maintain with organic matter |
| 7.0 – 8.0 | Alkaline – common on chalk or limestone soils | Brassicas, spinach, asparagus, herbs (rosemary, lavender) | Avoid lime; use sulphur or peat-free compost to lower pH slowly; grow tolerant crops |
| Above 8.0 | Very alkaline (rare in most UK allotments) | Only tough species like chard, beetroot, kale | Consider raised beds with imported acidic soil; do not fight the site |
Beyond pH: Testing soil texture (clay vs sand)
Knowing if your soil is sticky clay, free-draining sand, or a silty loam is just as important as pH. Texture determines how often you water, how deep you dig, and which crops struggle. The good news: you don’t need a kit. Use the ribbon test and the jar test.
The Ribbon Test (quick field check):
1. Take a small handful of moist (not wet) soil.
2. Squeeze it in your palm. If it crumbles immediately, it’s sandy.
3. Try to roll it into a ribbon between your thumb and forefinger. If it forms a ribbon that holds together for 2-3 cm before breaking, it’s a clay loam. If it makes a long, smooth ribbon over 5 cm, it’s heavy clay. If it won’t ribbon at all, it’s sand or silt.
The Jar Test (home lab):
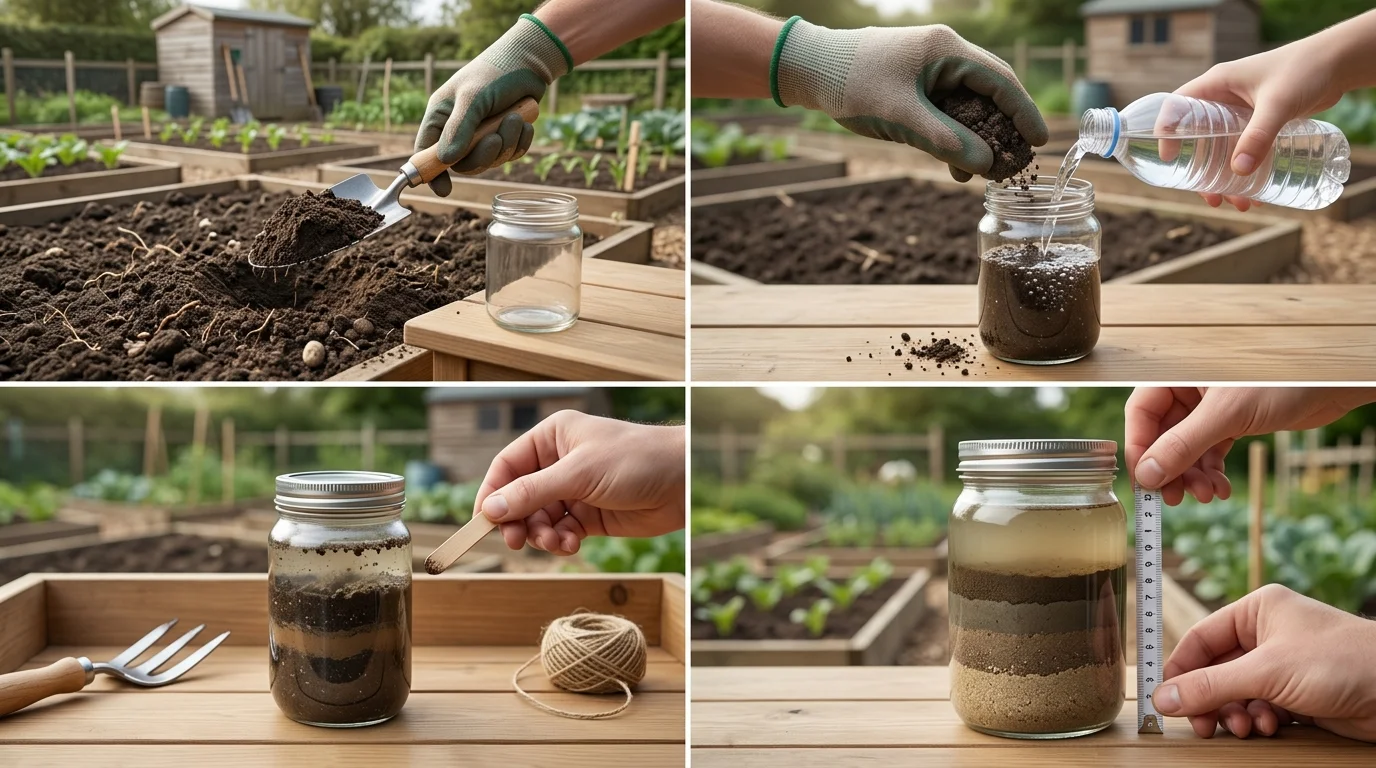
Fill a clean glass jar one-third full with soil. Add water until the jar is two-thirds full. Add a teaspoon of salt (to help particles settle). Shake vigorously for 2 minutes. Let it settle for 24 hours. You’ll see distinct layers: sand at the bottom, silt in the middle, clay on top. Measure each layer’s height. Use a simple soil texture triangle online to classify it.
Most UK allotments on clay (like mine in Yorkshire) will show a thick sand layer, a thin silt layer, and a prominent clay layer. A clay vs sand ratio of roughly 40% sand, 20% silt, 40% clay is common. That’s a heavy clay loam – it holds nutrients well but drains poorly. Sandy soils (>60% sand) drain like a sieve and leach nutrients.
Nutrient levels: What your test kit can (and can’t) tell you
Cheap home kits often claim to test nutrient levels (nitrogen, phosphorus, potassium). I’ll be blunt: these are unreliable. The colour charts are vague, and nitrogen especially fluctuates daily with weather and microbial activity. Save your money. Instead, observe your plants. Yellow lower leaves on brassicas? Likely nitrogen deficiency. Poor flowering and fruit set on tomatoes? Possibly low phosphorus. Purple leaf edges on maize? Potassium shortfall.
For a real picture, send a sample to a professional lab like NRM Laboratories (about £30 for a full analysis). But for most plotters, a pH test plus visual cues is enough. Soil testing kit results for NPK are better used as a loose indicator than a gospel.
Practical fixes based on your results
Once you know your pH and texture, here’s your action plan:
– Acid clay (pH 5.5, heavy clay): Add lime in autumn (not with manure) at 300-500g per sq m. Use green manures like winter tares to improve structure. Avoid walking on wet clay.
– Alkaline sand (pH 7.5, sandy): Incorporate well-rotted farmyard manure (not peat) to lower pH slightly and retain moisture. Water more frequently. Grow carrots and parsnips – they love loose sand.
– Ideal loam (pH 6.5, balanced): Rejoice, but don’t get complacent. Add organic matter annually. Test again in 2 years. Rotate crops to prevent nutrient mining.
When to test
Test in autumn after clearing beds, or in early spring before planting. Avoid testing within 6 weeks of adding lime, manure, or fertiliser – they skew results. Record your readings in a notebook. Over time, you’ll see trends. I’ve tracked my plot’s pH creep from 5.8 to 6.4 over five years of adding wood ash and lime. That data is gold.
Frequently Asked Questions about Soil Testing
Can I use vinegar or baking soda instead of a kit? Yes, for a rough pH check. Add a teaspoon of soil to a cup of vinegar. If it fizzes, it’s alkaline. In a separate cup, add soil and water, then add baking soda. If it fizzes, it’s acidic. This only tells you if soil is above or below pH 7, not the exact number. For precision, use a proper kit.
How often should I test my allotment soil? Every 2-3 years, or whenever you change your crop plan drastically. If you add a lot of lime or sulphur, test annually until stable.
My kit says pH 7.0 but my blueberries are dying. What gives? The kit might be inaccurate, or your sample was taken too near a limed bed. Retest with distilled water and fresh sample from the blueberry bed specifically. Blueberries need pH 4.5-5.5 – if your kit reads 7.0, that’s the problem.
Is a digital pH meter better than a chemical kit? It depends. Digital meters are fast and easy, but they drift and need calibration. Chemical kits are slower but more consistent for occasional use. For under £15, get a good chemical kit. For regular testing, invest in a Bluelab pH Pen (about £50) and calibrate monthly.
Final word from The Plot Doctor
Testing your soil isn’t a chore – it’s an investment. That ten minutes with a soil testing kit saves you a season of disappointment. I’ve seen plotters spend £50 on fertilisers that were completely unnecessary because their pH was already perfect. I’ve also seen the opposite: a plotter with pH 8.5 who kept adding lime for years, making things worse.
Start with a how to test allotment soil pH routine, check your clay vs sand texture, and watch your crops respond. It’s the difference between guessing and knowing. And on an allotment, knowledge is the difference between a glut and a groan.
Now go get your hands dirty – but do it with a plan.