You’ve invested in a polytunnel for your plot. Now, imagine a 50mph Yorkshire gale peeling it open like a sardine can.
I’ve seen it happen. A neighbour’s brand-new polytunnel, proudly erected in September, was a twisted skeleton of metal and shredded plastic by November. The problem wasn’t the tunnel itself—it was how he anchored it. He’d skimped on ground anchors and just pegged the cover into the topsoil. That’s a recipe for disaster on any UK allotment, especially exposed clay or windy coastal sites.
Anchoring a polytunnel against UK wind is not optional; it’s the single most critical step for survival. Our weather is brutal—the Met Office regularly issues warnings for 60mph+ gusts, and a polytunnel acts like a giant sail. If it lifts, it can damage crops, injure people, and cost you hundreds to replace. Let me walk you through the exact, science-backed method I’ve used across 20 plots in Yorkshire. This isn’t theory; it’s what keeps my tunnels standing while others fly away.
Why UK wind is your polytunnel’s worst enemy
Understanding the enemy is half the battle. UK winter gales are different from steady coastal winds. They’re gusty, turbulent, and often come from the southwest. A polytunnel’s curved shape actually creates lift when wind accelerates over the top. Think of an aircraft wing—that upward force is trying to rip your cover off and pull the frame from the ground.
Research from the RHS confirms that poorly secured polytunnels are the most common cause of winter crop loss in community allotments. The wind doesn’t just snap the frame; it gets underneath the base rail, lifts the whole structure, and sends it tumbling. Storm protection begins with the ground, not the cover.
The three-point anchoring system for UK clay and loam
After years of trial and error, I settled on a robust three-pronged approach. Each element compensates for the others. Here’s the blueprint:
1. Ground anchors for the frame (the backbone)
Most polytunnels come with basic metal pegs. Throw them in the shed—they’re useless for permanent plots. Instead, use:
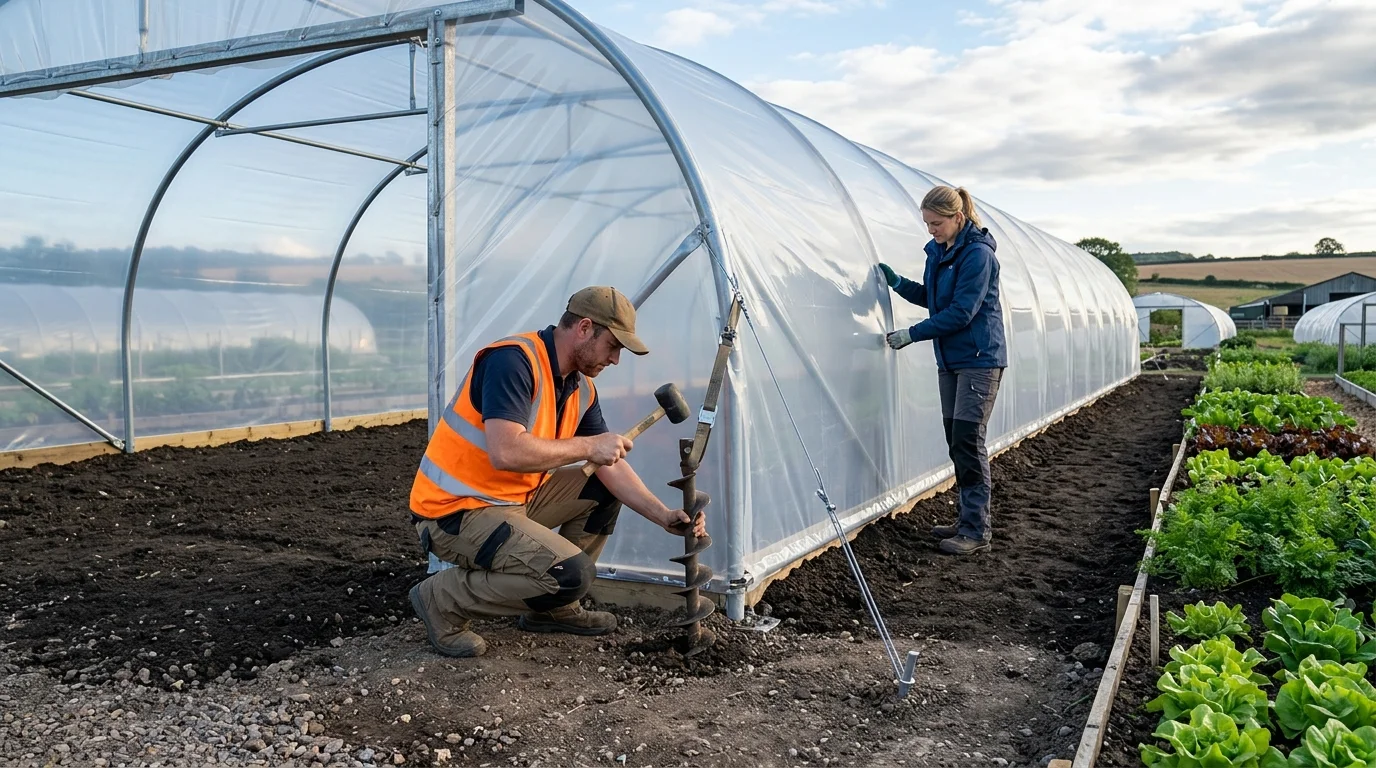
– Logistic-style auger anchors: These are spiral steel stakes, 600mm to 900mm long, sold by equestrian or fencing suppliers. Screw them into the ground at a 45-degree angle, pointing away from the tunnel, then attach a ratchet strap from the anchor to the tunnel’s base rail. On heavy clay, I’ve found 900mm anchors hold over a tonne of pull.
– Concrete foundation blocks: If your plot allows, pour a concrete strip footing (300mm wide, 400mm deep) for the base rails. Bolt the frame directly into the wet concrete using anchor bolts. This is the gold standard for exposed sites but requires planning permission on some allotments—check first.
2. Trenching the cover (the wind seal)
This is where most plotters fail. They just peg the plastic skirt into the soil. Wind gets under that gap, inflates the cover like a balloon, and rips it from the frame. Trenching the cover is non-negotiable.
Here’s my method:
– After erecting the frame, dig a 300mm deep trench around the entire perimeter, 200mm outside the base rail.
– Lay the polythene skirt into the trench, then fill the trench back with soil, tamping it down firmly with your boot.
– For extra grip, lay heavy flagstones or timber planks on top of the buried skirt inside the trench. This distributes the load and prevents the plastic from pulling out.
3. Cross-bracing and internal wind nets (the secondary defence)
Even with strong anchors, the frame can twist. Install cross-bracing wires from the top hoop to the opposite base rail. This triangulates the structure, turning a flimsy arch into a rigid cage. I use galvanised steel wire, 4mm thick, tensioned with a turnbuckle.
Finally, fit a windbreak net (50% shade net) on the inside of the windward side. This slows the airflow, reducing lift. The RHS trials at Wisley show that internal nets can reduce wind damage by up to 60%.
Step-by-step checklist to secure for winter gales
I’ve compressed my 15-year routine into a clean table. Print this and tick it off after you erect your tunnel.
| Step | What to do | Common mistake to avoid |
|---|---|---|
| 1. Site prep | Level the ground. Remove stones that can puncture the cover. Orient the tunnel with the door facing away from prevailing wind. | Placing the tunnel across the wind direction—this increases drag. |
| 2. Frame assembly | Bolt all joints tightly. Use locking washers. Install cross-bracing wires before fitting the cover. | Overtightening bolts on aluminium frames—can strip the threads. |
| 3. Cover fitting | Drape the polythene loosely on a calm, warm day (above 10°C). Use the ‘W’ fold method to avoid creases. Secure with base rail clips every 300mm. | Fitting in wind or cold—plastic is brittle and prone to tearing. |
| 4. Trenching | Dig a 300mm deep trench. Bury the skirt. Place heavy stones or timber on top of the buried plastic. Tamp soil firmly. | Skimping on depth—shallow trenches pull out in the first storm. |
| 5. Ground anchors | Screw 900mm auger anchors at 45° angles at each hoop base. Attach ratchet straps. For concrete plots, bolt base rails to strip footings. | Using short pegs or placing anchors vertically—lateral pull forces them out. |
| 6. Internal netting | Hang 50% windbreak net on the windward side (southwest). Stretch taut between hoops. | Using solid plastic sheeting inside—this can trap wind and cause flapping. |
| 7. Final check | After the first gale, check all anchors, straps, and buried edges. Re-tension if needed. | Assuming it’s ‘done’—ground settles, straps stretch. |
Storm protection on a budget: the thrifty grower’s approach
Not everyone can afford £50 auger anchors or concrete. I get it. For the thrifty grower on a fixed income, here’s a cost-effective alternative that still works:
– Use old paving slabs: Lay heavy 600mm x 600mm slabs on the buried trench edge. Two per side are enough.
– Reclaimed scaffolding poles: Hammer 1m lengths of steel pipe into the ground at 45° angles. Attach the frame with wire.
– Gravel bags: Fill heavy-duty rubble sacks with sharp sand or gravel. Place them on the base rail at each hoop. This adds temporary weight but isn’t as secure as anchors—use it only for sheltered plots.
A word on polycarbonate tunnels: These are heavier but catch more wind. Use the same anchoring system, but double the number of ground anchors. I’ve seen polycarbonate panels rip off their rails in strong gusts.
Which UK polytunnel brands already have good anchor systems?
From personal tests:
– First Tunnels: Their ‘Storm Shield’ range includes reinforced base rails and pre-drilled anchor holes. Good for clay.
– Northern Polytunnels: Offer a ‘Heavy Duty’ kit with thicker gauge steel hoops. Still, you must add your own auger anchors.
– Cheap budget tunnels: Avoid unless you plan to replace the pegs immediately. The included anchors are often 150mm tent pegs.
Case study: how I saved my tunnel after a 70mph storm
In January 2023, Storm Otto hit Yorkshire with 70mph gusts. My tunnel is on a raised plot with full exposure. I had:
– 900mm auger anchors at every hoop (8 total).
– Trenches buried with flagstones.
– Internal windbreak netting.
Result: Zero damage. The tunnel flexed about 15mm at the apex but never lifted. My neighbour, who used standard pegs and no trenching, found his tunnel 50 metres away in the brassica bed. The cost of proper anchoring is a fraction of replacement.
Frequently asked questions on anchoring a polytunnel against UK wind
How deep should I trench the polytunnel cover?
At least 300mm (12 inches). Shallower trenches can rip out in sustained winds above 40mph. On sandy soil, go 400mm. Use heavy stones or timber on top to weigh it down.
Can I use guy ropes instead of ground anchors?
Guy ropes can help but they’re a secondary measure. They’re prone to loosening and can trip people. I recommend auger anchors as the primary system, with ropes only for very exposed sites.
Do I need to anchor a small 6x8ft polytunnel?
Absolutely. Smaller tunnels have less weight but still act as sails. Use at least four 600mm ground anchors and trench the cover. I’ve seen 6×8 tunnels flip in moderate winds.
What’s the best time to anchor my polytunnel?
Do it immediately after erecting the frame, before fitting the cover. Anchoring after the cover is on is dangerous—the plastic can lift the frame while you work.
Can I use concrete blocks instead of trenching?
Yes, but only as a supplement. Concrete blocks around the base prevent the plastic from lifting, but they don’t stop the frame from pulling out of the ground. Always combine with ground anchors.
Final advice from a plot doctor
Grow smarter, not harder. Anchoring a polytunnel against UK wind is not a one-time job; it’s a yearly maintenance task. Each autumn, check your anchors, re-tension straps, and inspect the buried cover for rodent damage (voles love chewing through the skirt). I also recommend adding a second trench of heavy gravel around the base—it helps drainage and holds the cover in place.
If you’ve already got a tunnel up and are reading this after a storm… don’t panic. You can add extra anchors now by digging small holes beside the base rail and screwing in augers. It’s not ideal, but it’s better than losing the tunnel.
Your polytunnel is a fantastic tool for extending the season, protecting crops from rain and wind, and growing heat-lovers like tomatoes and peppers. But only if it stays where you put it. Spend the time on anchoring now, and you’ll be harvesting chillies while the gales howl outside.